
Zongyao-Li
make life easier
Github-Token
Setting up Github Token
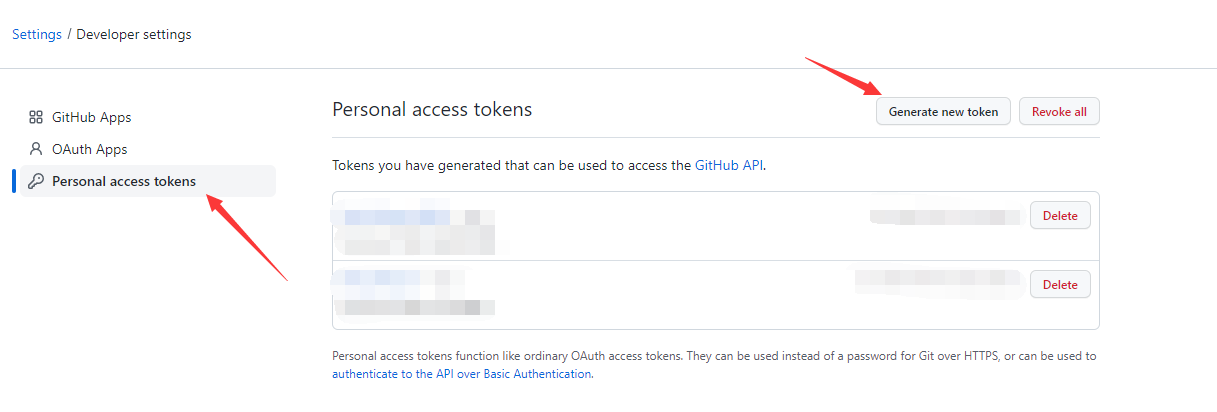
- Click on the avatar in the upper right corner, and then enter the settings;

- Find Developer settings at the bottom of the page and click to enter

- create token;
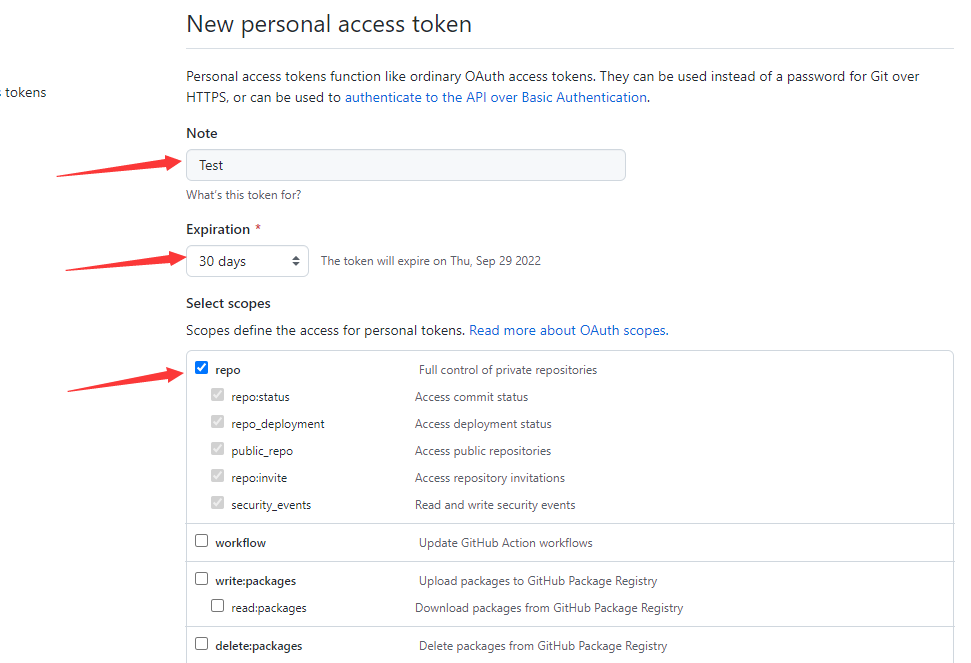
- Fill in the description (also fill in as you like), check the checkbox repo, then go to the bottom of the page Generate token and you’re done
Hello World
Welcome to Hexo! This is your very first post. Check documentation for more info. If you get any problems when using Hexo, you can find the answer in troubleshooting or you can ask me on GitHub.
Quick Start
Create a new post
1 | $ hexo new "My New Post" |
More info: Writing
Run server
1 | $ hexo server |
More info: Server
Generate static files
1 | $ hexo generate |
More info: Generating
Deploy to remote sites
1 | $ hexo deploy |
More info: Deployment
FixPixGo
PicGo introduction
PicGo: A tool for quickly uploading images and getting URL links to them.
- Support drag and drop image upload
- Support shortcut to upload the first image in clipboard
- Windows and macOS support for right-click image file upload via menu (v2.1.0+)
- Automatically copy links to clipboard after uploading images
- Support for customizing the link format for copying to the clipboard
Problems encountered
When configuring PicGo, you need to pay attention to the name of the repository
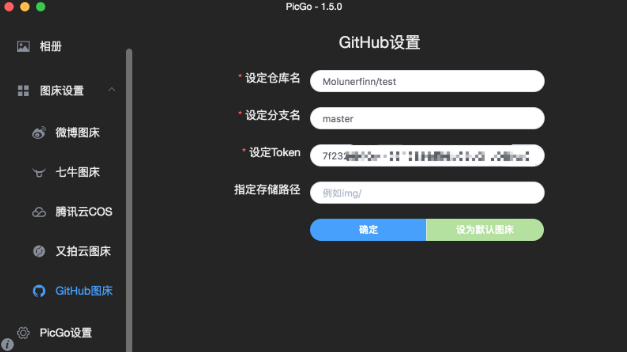
The format of the repository name is
1 | username/repository |
Make sure the address contains the username. It took me a long time to just write the name of the repository when I first filled it out.
FixOculus
Sometimes it shows error OVR88948175 when installing the Oculus desktop software.
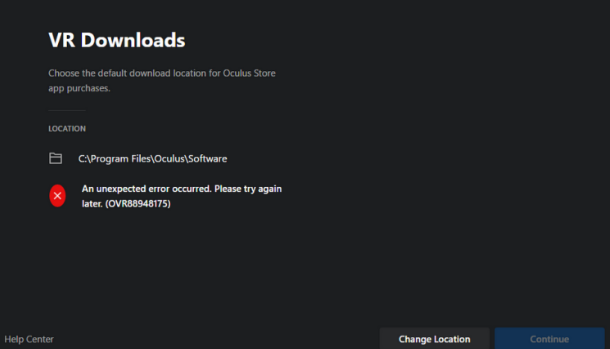
This is usually a permissions or access error, meaning the user (student) doesn’t have “write-access” to certain folders.
Solutions
Copy and paste the below command for users that have logged in or are currently logged in:
1 | REG ADD "HKCU\Software\Oculus VR, LLC\Oculus\Libraries" |
更改使用了hexo-theme-yilia-plus主题
更改了博客的主题,使用JoeyBling完善修改的hexo-theme-yilia-plus作为博客的主题,十分感谢作者的付出。更改了背景音乐。
布局和色调都非常的舒服.
简单步骤
用git bash,进入到博客的本地目录中,
1 | $ cd 你的博客目录路径 |
修改配置文件
git克隆完成后,打开当前目录下的“_config.yml”配置文件。
找到theme的配置选项,一般在文件的最后。之后,将theme选项配置为我们新下载好的next主题即可。(“:”冒号之后空格不可少)
调试,发布
1 | $ hexo server --debug |
Verizon port forwarding
Verizon Model Name: G3100
What is Port Mapping:
Port mapping is to map a port of a host in the internal network to a port of a host in the external network to provide the corresponding service. When a user accesses this port of an external IP, the server automatically maps the request to the machine inside the corresponding LAN.
Note that the port forwarding is from the external port of the router to the device port of the internal network.
Setup for Verizon routers
- Access the Router Configuration console, and then click Settings (on the left).In the Advanced tab, click Continue.
Click Forwarding Port.
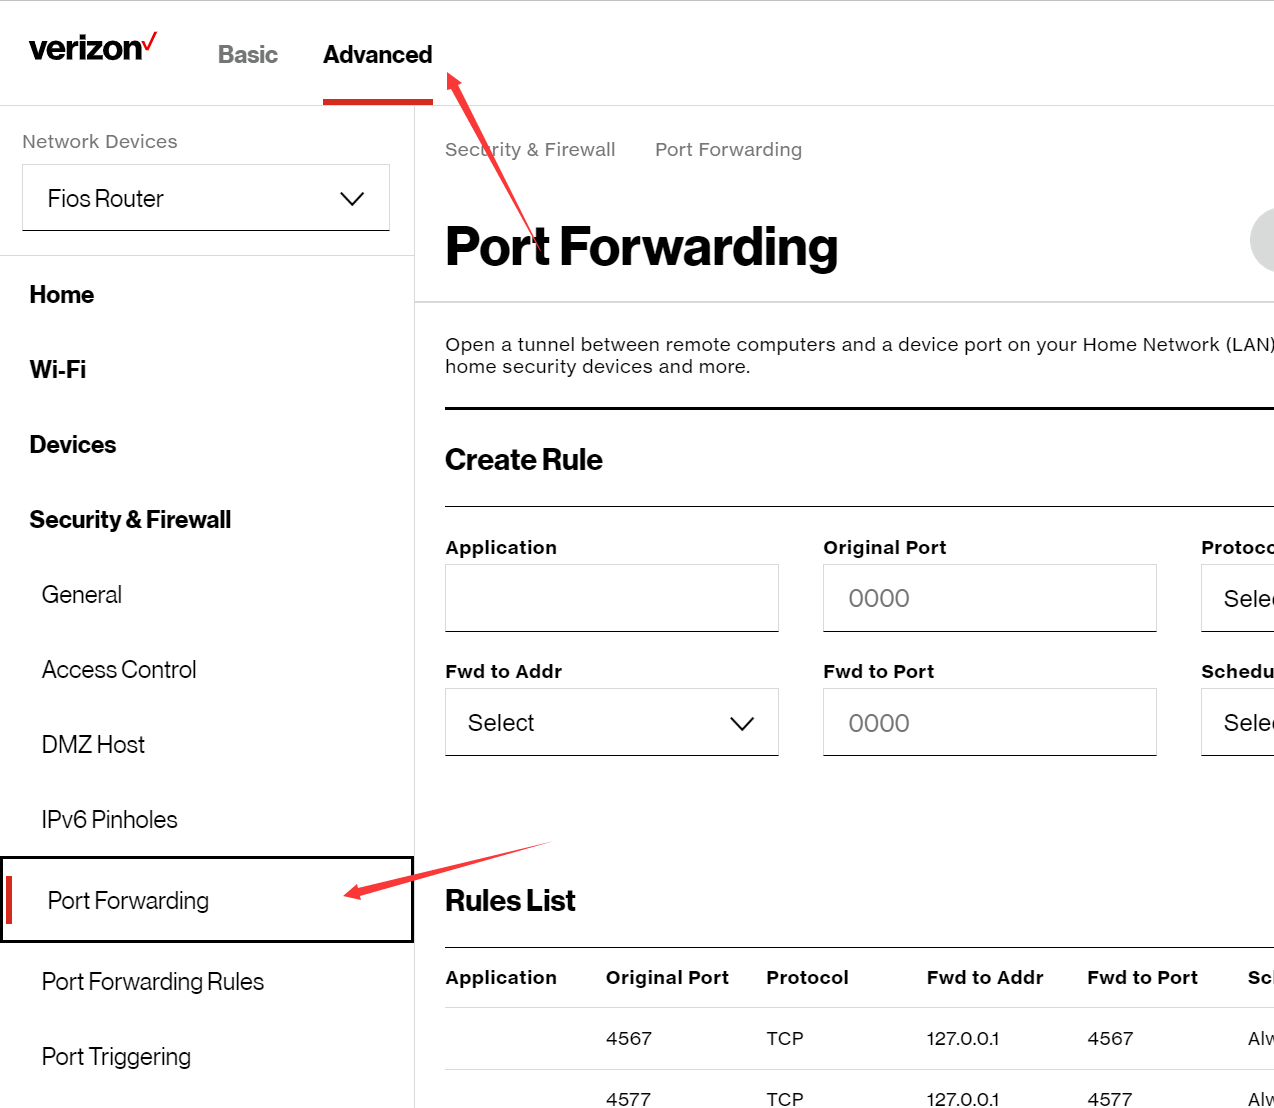
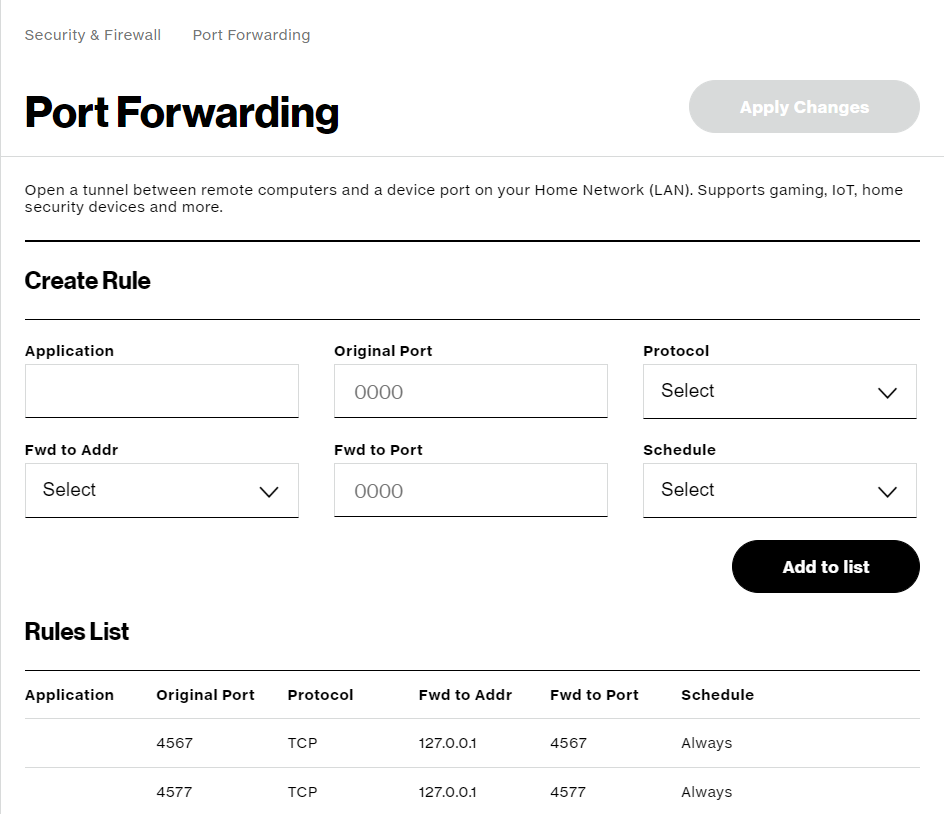
- Application for custom names.
- Original Port is the external port number
- Fwd to Port is the internal device port number
- Protocol choose both
- sechedule set Always
Git lightweight
citi:git-scm
Git 标签 (Git Basics - Tagging)
打标签
像其他版本控制系统(VCS)一样,Git 可以给仓库历史中的某一个提交打上标签,以示重要。 比较有代表性的是人们会使用这个功能来标记发布结点( v1.0 、 v2.0 等等)。
列出标签
在 Git 中列出已有的标签非常简单,只需要输入 git tag (可带上可选的 -l 选项 –list):
1 | $ git tag |
这个命令以字母顺序列出标签,但是它们显示的顺序并不重要。
你也可以按照特定的模式查找标签。 例如,Git 自身的源代码仓库包含标签的数量超过 500 个。 如果只对 1.8.5 系列感兴趣,可以运行:
1 | $ git tag -l "v1.8.5*" |
创建标签
Git 支持两种标签:轻量标签(lightweight)与附注标签(annotated)。
轻量标签很像一个不会改变的分支——它只是某个特定提交的引用。
而附注标签是存储在 Git 数据库中的一个完整对象, 它们是可以被校验的,其中包含打标签者的名字、电子邮件地址、日期时间, 此外还有一个标签信息,并且可以使用 GNU Privacy Guard (GPG)签名并验证。 通常会建议创建附注标签,这样你可以拥有以上所有信息。但是如果你只是想用一个临时的标签, 或者因为某些原因不想要保存这些信息,那么也可以用轻量标签。
附注标签
在 Git 中创建附注标签十分简单。 最简单的方式是当你在运行 tag 命令时指定 -a 选项:
1 | $ git tag -a v1.4 -m "my version 1.4" |
-m 选项指定了一条将会存储在标签中的信息。 如果没有为附注标签指定一条信息,Git 会启动编辑器要求你输入信息。
通过使用 git show 命令可以看到标签信息和与之对应的提交信息:
1 | $ git show v1.4 |
输出显示了打标签者的信息、打标签的日期时间、附注信息,然后显示具体的提交信息。
轻量标签
另一种给提交打标签的方式是使用轻量标签。 轻量标签本质上是将提交校验和存储到一个文件中——没有保存任何其他信息。 创建轻量标签,不需要使用 -a、-s 或 -m 选项,只需要提供标签名字:
1 | $ git tag v1.4-lw |
这时,如果在标签上运行 git show,你不会看到额外的标签信息。 命令只会显示出提交信息:
1 | $ git show v1.4-lw |
输出显示了打标签者的信息、打标签的日期时间、附注信息,然后显示具体的提交信息。
缺失模块。
1、请确保node版本大于6.2
2、在博客根目录(注意不是yilia-plus根目录)执行以下命令:
npm i hexo-generator-json-content --save
3、在根目录_config.yml里添加配置:
  jsonContent:
    meta: false
    pages: false
    posts:
      title: true
      date: true
      path: true
      text: false
      raw: false
      content: false
      slug: false
      updated: false
      comments: false
      link: false
      permalink: false
      excerpt: false
      categories: false
      tags: true